Okay, so as I try to chill on the couch (boring and making me heftier by the minute), I roam Pinterest and blogland looking for inspiration for..well..anything. On my internet adventures I have found a couple of relatively easy paper folding/cutting projects that reel you in and make you want to be a better person. Um, that last part may or may not be true. They definitely make me want to be better at making paper things. Which will hopefully make me a better person. Or a worse person because now I'm addicted to making paper things. Try not to over analyze it.
First up- the paper snowflake. I really thought these would be so simple. I mean, aren't the kids coming home from preschool with them? After looking at lots of tutorials and much trial and error, I am convinced that preschoolers are geniuses. My hangup has always been with the folding- like how in the heck do you get a 6 pointed flake instead of 4? I wish I understood it well enough to explain it. I'm still pleasantly surprised every time it works. I ended up loosely following these instructions [Confession- reading instructions puts me to sleep, so I looked at the pictures (which was not super helpful), and kept telling Oliver, "I think I got it now!" Only to open up a third of a snowflake.] But I know you are so good at reading and comprehending instructions. Go.
Easy Paper Snowflakes
What you will make:
In this project, learn an easy way to make snowflakes from tissue paper. With this technique, you can make a whole flurry of snowflakes in a hurry, and no two snowflakes will be the same! Using tissue paper makes cutting through many layers easier, but you can use any lightweight paper you like.
This project is great for family, classroom or group craft time. It requires no patterns and uses simple materials.
Related projects: See another way to make snowflakes and learn more about snowflakes in the Symmetry in Snowflakes craft project.
Here's what you need:
- Tissue paper (white or colored)
- Scissors
- Optional: Craft knife, ruler and cutting mat, hole punches
This project is rated EASY to do.
How to Make Paper Snowflakes, the Easy Way
Read all of the steps before starting.
- Step 1: Project Preparation
- Pre-cut 5" to 10" strips of tissue paper along the width or length of the tissue paper sheet. The width of the strip determines the size of the final snowflakes. Use any colors of tissue paper you like. Straight sides and square corners are important!
- Step 2: Cut Squares
-
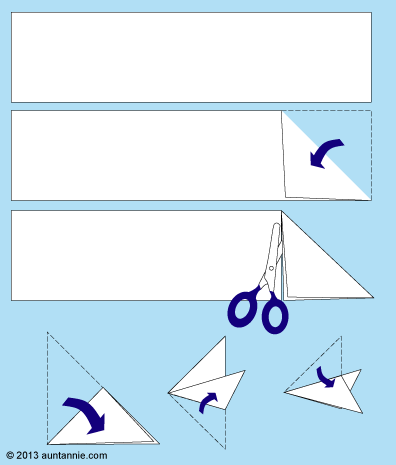
Cutting paper snowflakes depends upon starting with a perfect square. Starting at one end of the strip, fold the top corner over to meet the opposite side. This forms a folded triangle and is the first fold for your snowflake. Cut it away from the strip along its vertical edge. If you open the folded triangle, a perfect square is revealed.Continue cutting squares from the strip until you reach the end.Tip: Any extra tissue paper at the end of the strip can be saved to use in other crafts.
- Step 3: Fold
- Start with the square folded in a triangle. Fold the triangle in half again, then fold it in thirds. To fold in thirds, fold one side over, then fold the other side over on top of it. The edges should match.Tip: Folding in thirds is a bit of trial and error. That is: adjust the first fold, as needed, to get even thirds.Tip: If folding thirds is too much trouble, just fold the triangle in half again, and then in half again. You'll get 16-point snowflakes instead of 12-point snowflakes. Not quite like Mother Nature, but still plenty of fun!
- Step 4: Cut Snowflakes
-
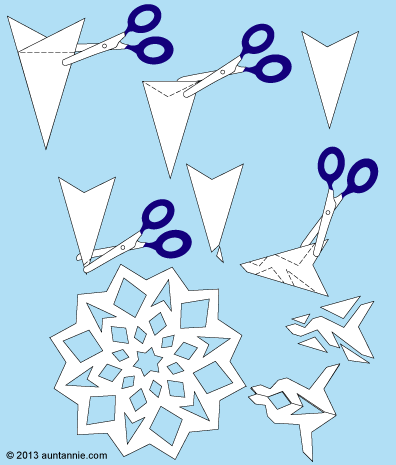
Cut the uneven points off the top. Now you'll make V-shaped snips to create your snowflake.Cut a V-shape in the top. Cut from the top corners or from along one side or the otherCut the tip away at any angle you like.Cut more V-shapes along the folded sides.Carefully unfold the tissue paper to reveal your snowflake!Tip: Make the V-shaped snips any size and shape you like—make them big or small, shallow or deep, even or lopsided.That's it! Now make a whole flurry of paper snowflakes!
Disclosure: I used white printer paper and I didn't follow their cutting pattern. So basically I took from this how to get 6 points. Tha's it and tha's all.
Next up- the trees. Actually much easier than the flakey flakes. Here you go:

The difficult part is at the beginning, steps (1) and (4), (5) and (6), where the folded part has to be opened and folded inside. This is repeated three more times. When you are ready with the one side, turn the form and repeat the steps again.


Cut the lower part with scissors.

Make 5 symmetrical cuts at the two sides and start folding one after another, and your fir tree is ready.


4 comments:
what the WHAT?? how are those trees possibly easier than snowflakes?!?!? my mind is in a knot. i really wish i could follow it, though, because adorable.
p.s. when you're doing the snowflakes, just try folding them in half one more time. i think that'll get you to six points! ... yeah, i'm something of an expert after cutting out two or three dozen a couple years ago. :) no biggie. i'll sign autos later.
Thanks Ang! I actually did end up figuring it out eventually, but I would love a formal lesson from you...and your Herbie Hancock. :)
What the what?? Is right Ang!!! Oh my goodness.....I thought I had it....but atlas...my tree did not turn out. What a mess... My mind is not comprehending....Skype class??? Lol!! I had this great idea...I'll just have to stick with snowflakes. Thanks for posting directions Liz!!!
tonya nailed it--skype class for the delinquents! i'll be in the front row, taking notes.
NOTE: HAHAHA my code is "suffering." i'll say!
Post a Comment